Sub-Topics

Ace CLI

Actions

Authentication

Authorization

Bouncer

Components

Controllers

Drive

EdgeJS


HttpContext
InertiaJS

Lucid

Rate Limiting

Router

Services

Testing

Tips

Validator
Series
Pragmatic Testing in AdonisJS with Japa
Throughout this series, we'll introduce the Japa testing framework, which comes prepackaged with most AdonisJS starter kits. We'll understand how it integrates with AdonisJS, the CLI options it provides, it's assertion library, plugins, and more.
AdonisJS Scenarios
In this ongoing series, we'll cover various scenarios you're likely to run into while developing or maintaining an AdonisJS application. Topics will range from authentication challenges to database management, testing, and more.
Building A Multi-Search with Meilisearch & AdonisJS
In this series, we'll build a server-rendered mutli-search utilizing Meilisearch, Unpoly, and a sprinkle of AlpineJS. We'll setup factories and seeders to make fake data to allow us to index and search against books, authors, and genres simultaneously!
AdonisJS Quick Tip
Quick tips, lessons, and screencasts covering specific topics on AdonisJS.
Adding an API to an AdonisJS Web App
In this series, we'll add a API, using Opaque Access Tokens for authentication, to a preexisting web application. We'll implement dual-guard authentication, add a token management panel, and authenticate our API directly with an organization model!
Building with AdonisJS & Inertia
We'll learn how to use InertiaJS with AdonisJS 6 to build a feature-complete application, called PlotMyCourse. Our application will use server-side rendering (SSR), Vue 3, and Shadcn-Vue. It'll feature organizations, drag-and-drop, and lots of forms.
AdonisJS In 30
In this series, we'll highlight various features and functionalities in AdonisJS you can complete in about 30 minutes or less.
Let's Learn AdonisJS 6
In this series, we'll learn AdonisJS 6 step-by-step in a beginner-friendly way. Covering topics like routing, controllers, services, EdgeJS, Lucid ORM, forms, filtering, authentication, etc.
EdgeJS Components
In this series, we'll take a deep dive into EdgeJS Components by creating our own reusable components from the PinesUI component library, built with TailwindCSS and ApineJS.
Discussions
Cloudflare R2 for Video Storage
Hi Tom,I just read your fantastic article on Adocasts, "Testing Cloudflare R2 for Video Storage," and wanted to say, great job. The solution you've outlined is really clever and I found the implementation very interesting.I'm writing because...
Add a webhook endpoint to AdonisJS web app | FIXED
I'm just getting started with AdonisJS, I used the web app template, and now I need to add a webhook endpoint, so I can receive events from third-party platforms(such as payments) how can I do that.Excuse my newbie question.UPDATEFixed it, ...

Averaging over time period and grouping by properties
So i have a adonis model where i store propertyValue and each entry has a timestamp (ISO 8601). There are several properties which is related via a propertyId. So my objective is to aggregate data and get averages over a day for a particular...
Adonis + Docker
Hello, Is there a lesson talking about adonis development / deployment using docker docker-compose?
building-with-adonisjs-and-inertia repository setup error on local machine.
Hello I'm trying setup this project: https://github.com/adocasts/building-with-adonisjs-and-inertia on my local machine and I'm getting this error: [postcss] /home/thiago/study/node/building-with-adonisjs-and-inertia/inertia/components/SettingsShell...
Not able to share flash messages to frontend with inertia
I can't figure out how to get flash messages to my frontend with inertia.. // config/inertia.ts sharedData: { notifications: (ctx) = ctx.inertia.always(() = ctx.session?.flashMessages.get('notifications')), } // app_controller....
Lessons

Authentication in Browser Tests
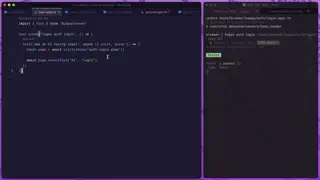
In this final lesson, we'll learn how to use AdonisJS Authentication with the Browser Client. We'll install and configure the Session and Auth browser plugins and visit an auth-protected page to show how it all works.

Testing Browser Form Submissions & Validation Feedback
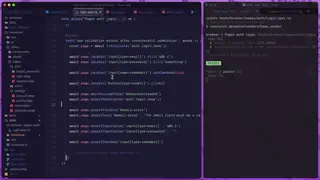
In this lesson, we'll learn how to test form submissions and validation using Japa's Browser Client and Playwright. We'll programmatically fill and submit our form and assert the visibility and contents of our validation errors.


The Browser Client
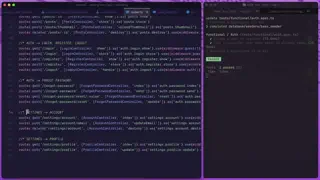
In this lesson, we'll softly introduce Browser Testing, which allows powerful DOM assertions, in AdonisJS using Japa's Browser Client and Playwright. We'll get everything installed and configured and write our first simple test.


Piecing It All Together
In this lesson, we'll piece everything we've learned thus far together and create functional tests for a route allowing the authenticated user to change their email. This encompasses authentication, email sending, database records, and more


Testing Authorization with Bouncer
In this lesson, we'll learn to test AdonisJS Authentication with Bouncer for actions like deleting a post. We'll cover happy paths where authorization is granted and sad paths where authorization is denied and the action is forbidden.


Testing Auth Protected Routes
In this lesson, we'll learn how to test auth-protected routes via the auth middleware and non-auth-protected routes via the guest middleware. We'll ensure our user is redirected appropriately and shown a flash message where applicable

The Auth Plugin
In this lesson, we'll learn how to test authenticated routes in AdonisJS/Japa. First, we'll install and register the Auth API Client plugin. Then, we'll learn how to use our User Factory to create a user and login as them for our test's request.

Testing Model Logic
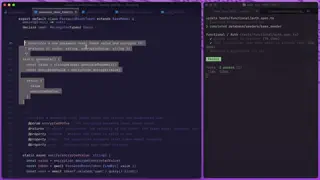
In this lesson, we'll learn how to Unit Test AdonisJS Model logic using Japa. We'll test a password reset token's validity to show instance-level tests. Then, we'll test its generate and verify methods to show static methods.


Testing with Lucid Model Factories
In this lesson, we'll learn about AdonisJS Model Factories and how we can use them to create realistic, yet fake, test data. We'll create a few factories we'll use in this series and learn how we can stub or create data with them in tests.
Snippets
Accessing Lucid's Knex Connection Client
Ever need to directly access KnexJS, the query builder Lucid wraps around? Here's how you can do it!
Simple AdonisJS 6 Layout Component
With AdonisJS 6, layouts have been removed in favor of components. In this snippet, we provide a simple layout component example.
Get User IP Address when Server is Proxied by Cloudflare
If your server is proxied by Cloudflare, chances are the built-in method to get the user IP Address in AdonisJS is returning Cloudflare's IP instead of your users. With this snippet, we'll fix that!
Using Transaction Events To Defer Actions
We can bind handlers to transaction events to easily defer specific actions until after the transaction has been committed and our changes have persisted to the database.
Require Route Parameter To Start With @ To Match
You can use route matchers to specify requirements on the route parameter. In this snippet, we require our username param to start with the @ character for the route to match.