Lessons
Our series are curated collections of lessons that walk through a specific topic from beginning to end. Series are a great way to learn a topic in a structured way.
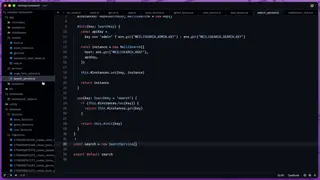

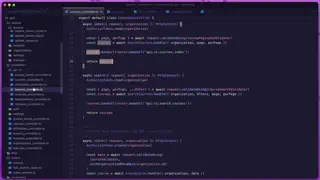
Creating a Command to Index Data in Meilisearch
In this lesson, we'll create an Ace CLI command to index our pre-existing data within our Meilisearch database so it is ready to search against. We'll walk our way through this and point out what to watch out for and how to view task errors.


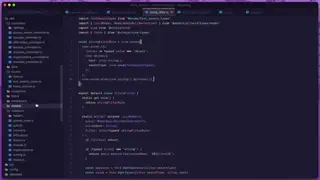
Creating A Meilisearch Service to Initialize Admin & Search Instances
In this lesson, we'll create a singleton Meilisearch service to simplify operations against our Meilisearch database by allowing us to specify whether we want to simply search or perform an admin authorized operation.


Seeding Fake Data to Index for our Multi-Search
In this lesson, we'll create a database seeder that will utilize our model factories to generate plenty of fake data to index and search against. We'll also discuss how we can easily batch insert bulk data in a single call.

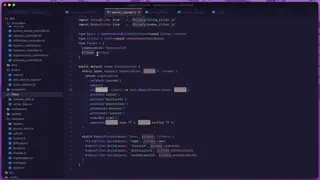
Creating our Database Migrations, Models, and Factories
In this lesson, we'll work on structuring our database by defining our migrations, Lucid models, and model factories to aide in generating fake data we'll later index and search against with Meilisearch.

Creating our AdonisJS Project & Setting Up our API Keys
In this lesson, we'll create our AdonisJS project and utilize our Jumpstart helper to bypass some set up work and keep the series on topic. We'll then integrate our Meilisearch API Keys into our project so they're ready to go!

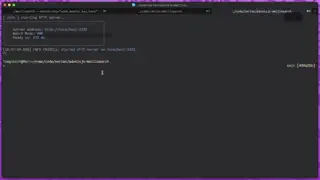
Meilisearch Installation & Setup
In this lesson, we'll focus on installing and setting up the open-sourced version of Meilisearch locally on our machine for use throughout this series.


What We'll Be Building
In this series, we'll be building a completely server-rendered multi-search using Meilisearch, Unpoly, and a little AlpinzeJS. We'll setup the open-source version of Meilisearch locally, setup seeders and factories to build fake data to index, and more!

AdonisJS Quick Tip #25.0
How To Globally Alter Lucid's BaseModel
In this lesson, we'll discuss how we can globally alter Lucid's BaseModel to make global changes across all our application's models. We'll walk through globally changing the naming strategy and extras serialization as examples.


AdonisJS Scenarios #2.0
How To Configure & Use Multiple Authentication Guards
In this lesson, we'll walk through how to set up a new AdonisJS project with both session and opaque access token authentication guards. We'll then walk through a quick authentication demo for each and disable CSRF on our API routes.


AdonisJS Scenarios #1.0
Inspecting Lucid Queries for Index Analysis
In this lesson, we'll walk through how you can inspect specific or all Lucid queries within your AdonisJS application. We'll then use this to analyze a slow queries execution plan, determine an appropriate index to add, and add that index via a migration.

AdonisJS Quick Tip #24.0
How To Redirect Back to the Previous Page After Login with AdonisJS
In this lesson, we'll learn an easy way we can safely redirect our user's back to their original page after they login or register in an AdonisJS application. We'll also verify the URL matches an actual GET route definition within our application.


Rate Limiting an Organization's HTTP Requests
In this lesson, we'll cover how to throttle how often an organization can hit our API using HTTP Rate Limits, which is crucial for preventing spam, limiting content access, and managing server load.

User-Defined Relationship Loading
In this lesson, we'll let our users tell us which relationships they'd like to get back in our lesson search. We'll also discuss how to handle nested relationships and what to watch out for.

Filtering Lessons by Publication Date
In this lesson, we'll add the ability to search lessons by their publish date and time. We'll utilize before and after properties to allow for filtering that can look forward, backward, or within a specific date range on our lesson's publish at column.

Searching and Filtering Lessons
In this lesson, we'll take the filters we've created thus far and apply them to a new lessons search endpoint. We'll be able to search our lessons by name, status, access level, and module.

Making our Search Course Action Easily Reusable
In this lesson, we'll make our search course filters optional to increase the reusability of our action. We'll then switch our courses index route handler to use this action.

Filtering by a Number or Array of Numbers
In this lesson, we'll implement our number filtering system in which we'll allow our search APIs to accept a single number or an array of numbers to filter the data by. To validate this, we'll use the union rule from VineJS.
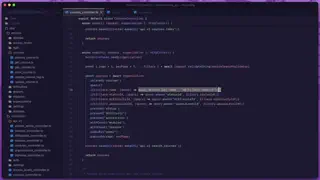

Advanced String Filtering
In this lesson, we upgrade our course name filter to support both simple strings and advanced object-based queries using VineJS’ union rule. This allows users to specify not just what to search for, but how to search for it.
Showing 37 to 54 of 457 results