AdonisJS migrations serve as a programmatically controllable historical view of our database. Meaning, we can utilize migrations to create new tables, foreign keys, indexes, and the like. Conversely, migrations can also be used to undo each of these as well.
The Migration Flow
From a historical sense, you can think of migrations as a timeline. The beginning of your timeline would be the older historical view, so back when your project was created and you were creating your first tables. Then, the end of the timeline would be the present point in time with the tables you're adding for that new feature you're working on for marketing.
Below is a brief example to give you a sense of the timeline I'm referring to. As we make migrations to create new database tables, foreign keys, or what have you, they'll be sorted and executed by the time of creation.
1. Aug 10 - Timeline start (Batch 1)
  A. 09:00AM - Roles
  B. 09:01AM - Users
  C. 09:02AM - Projects
  D. 09:03AM - Tasks
2. Sept 16 - Somewhere in the middle (Batch 2)
  A. 11:23AM - ProjectHistories
  B. 03:45PM - TaskHistories
3. Oct 30 - Now, with the newly added feature (Batch 3)
  A. 09:00AM - AuthAttempts
Now, above I'm using human-readable dates and times, but within our project, this time will be represented by a timestamp. In order to properly sort our migrations, the timestamp will be prefixed onto our migration's filename, suffixed with the underlying name we give that migration.
Below is an example of what the above would look like within our project.
1660136400000_roles.ts
1660136460000_users.ts
1660136520000_projects.ts
1660136580000_tasks.ts
1663341780000_project_histories.ts
1663357500000_task_histories.ts
1667134800000_auth_attempts.ts
In addition to the timestamp, you'll notice two naming conventions AdonisJS defines by default.
The file name for migrations is snake cased.
The file name for migrations are plural
Migration Directions
Since migrations behave like a timeline, there're two different directions we can go.
We can go forward, closer to the present point in time
We can go backward, closer to the project creation
These two directions are represented by two different methods within our migrations.
Forward is represented by the
upmethodBackward is represented by the
downmethod
If the up method for a migration hasn't been run, if it's not been applied to our database, the migration's status will be "pending." Once the up method is executed and the migration is applied to our database, the migration will then be marked as "completed" so it won't be run again if we go to run additional migrations later on. If, however, we run the down method on a completed migration, its status will be reset to "pending" so that AdonisJS knows to reapply it the next time it runs our migrations.
So, how do we actually make migrations and run the up and down methods for them? That's where the Ace CLI comes into play!
Migration Ace CLI Commands
If you run node ace within your terminal, this will list out all of the available commands the Ace CLI currently has registered.
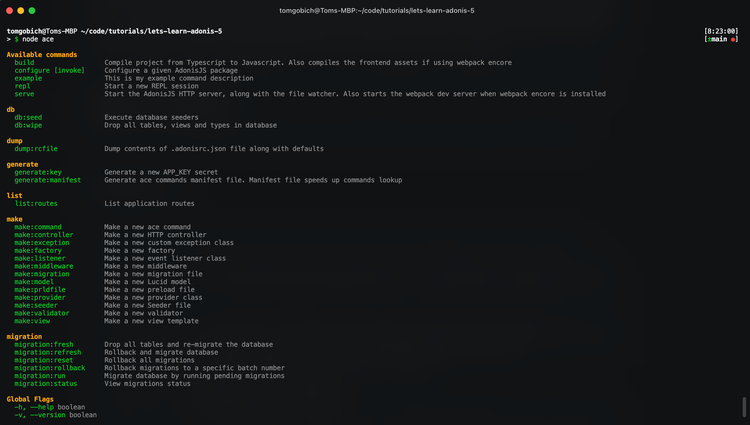
Let's run through each of the commands here that are applicable to migrations, starting with making a migration.
Making Migrations
Within the make command category, you'll see listed the command make:migration. This command is one way we can go about creating migrations, we'll discuss another once we learn about Models.
So, for most application's it's pretty typical to need a roles table, so let's go ahead and create a migration to create this table within our database. To do so, we'll run the make:migration command using the Ace CLI, and provide it the name of roles.
node ace make:migration roles › CREATED: database/migrations/1666820991961_rolesCopied!
Once the command completes, you'll see printed into your terminal that the migration file was created, prefixed with that timestamp we discussed earlier. Additionally, also note where the migration was created, inside our database/migrations directory. This is where all of your migrations will live. Remember, they'll be sorted by that timestamp prefix as well.
Let's also go ahead and create a users migration. This time, exclude the "s" so it's just "user" instead of "users".
node ace make:migration user › CREATED: database/migrations/1666820991962_usersCopied!
Notice that it applied the "s" automatically for us anyways. Remember the naming convention we discussed earlier? AdonisJS helps you by automatically applying the convention for you via the Ace CLI.
Running & Rolling Back Migrations
The Ace CLI comes with five different commands we can utilize to go forward and backward through our migration timeline. Note that each of these commands, like all Ace CLI commands, can be suffixed with -h or --help to view options and additionally accepted flags.
migration:run- The run command will execute our pending migration'supmethod allowing us to go forward in our timeline. Every time we executerunthe pending migrations that're run will be put into a batch. This batch comes into play with the other commands.migration:fresh- Fresh will drop all of our database's tables, regardless of migrations, then automatically executerunfor us.migration:rollback- Rollback allows us to go backward in our timeline to a specific batch (run execution), the default will be to go back a single batch. So, this will execute thedownmethod in each of the migrations for the batch(es).migration:refresh- Refresh will roll back the latest batch, then re-run that batch.migration:reset- Reset will rollback all of our migrationsmigration:status- Status will plop a table of your migrations in your terminal and display whether they're pending or if they've executed. It'll also display the migration's batch numbers as well.
In the next lesson, we'll be discussing the migration workflow and what changes once we have migration's that've been executed on our production environment.
Since we've created migrations for our roles and users tables, let's go ahead and inspect what happens with some of these commands.
Checking Our Migration Status
node ace migration:statusCopied!
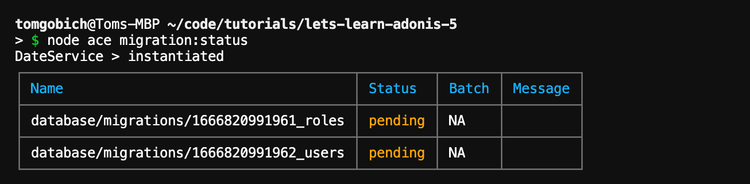
As we can see, both of our migrations are pending, since they haven't been run yet. Please ignore the DateService console log, this is from our earlier lesson where we covered services.
Running Our Migrations
node ace migration:runCopied!
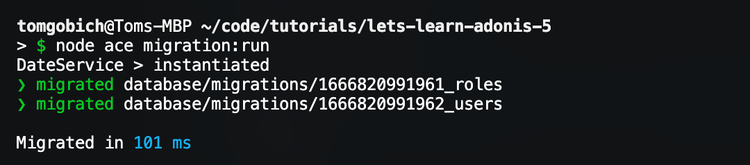
Sweet, both of our migrations have run successfully! We can verify this by checking the status again.
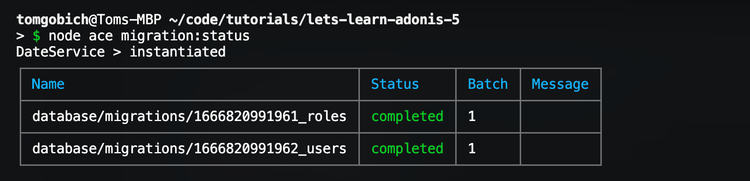
As you can see, both are indeed "completed" and both executed as part of batch one. If we take a look at our database using a GUI, like TablePlus, we should see both of these tables.
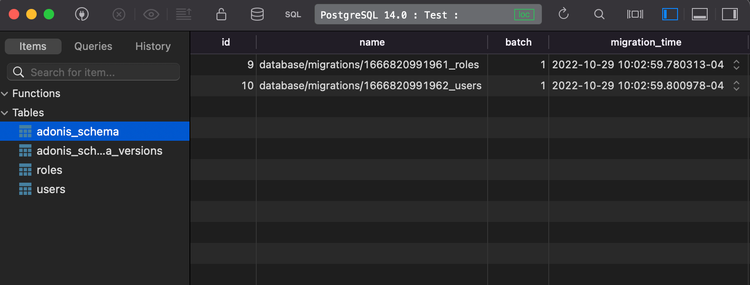
We do indeed see both of these tables, but we also see two other tables, adonis_schema and adonis_schema_versions.
The adonis_schema table tracks which migrations have run and which batch they ran in. This is the database representation of our migration status. Additionally, you can also see the exact time the migration was executed.
The adonis_schema_versions table tracks which schema version we're on, this comes into play so AdonisJS can more easily update items in the schema without breaking your implementation.
Rolling Back Our Migrations
Now, we've run our migrations, but we need to actually define the columns that should be a part of these tables. So, in order to update these existing migrations, we'll want to roll them back, make the changes to the migration files, the re-run the migrations.
It's important to note that rolling back migrations that created tables should delete those tables. So, when we do roll back, we'll no longer have a roles and users table within our database. Because of this, once the tables reach your production environment, you'll no longer want to utilize rollback on those particular migrations as this could lead to losing production data held within those tables. So, in order to apply updates to existing tables within production, you'll want to create a new migration to make the alteration. We'll be specifically focusing on this flow in the next lesson, but I felt it important to note here.
node ace migration:rollbackCopied!
You could also use migration:reset here.
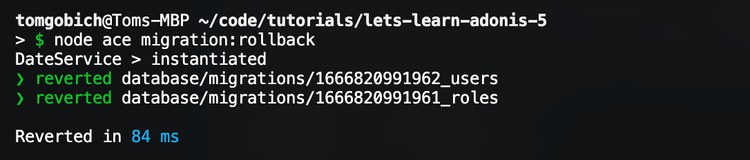
Now neither our users nor our roles table exist anymore and their status should be back to pending, let's verify this.
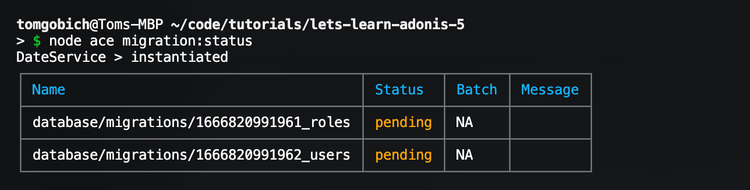
Perfect! Now that we're back to pending, we can make alterations to these migrations. Once we're done making the alterations, all we'll need to do is run them again to re-create the tables.
Defining Migration Tables & Columns
At present, both of our migrations will look like the below.
import BaseSchema from '@ioc:Adonis/Lucid/Schema' export default class extends BaseSchema { protected tableName = 'roles' // 👈 only difference is this will be 'users' in users migration public async up () { this.schema.createTable(this.tableName, (table) => { table.increments('id') /** * Uses timestamptz for PostgreSQL and DATETIME2 for MSSQL */ table.timestamp('created_at', { useTz: true }) table.timestamp('updated_at', { useTz: true }) }) } public async down () { this.schema.dropTable(this.tableName) } }Copied!
- database
- migrations
- 1666820991961_roles.ts
As you can see, a migration consists of a class that extends a BaseSchema defined by AdonisJS. Inside this class, we see those two methods we discussed earlier, up and down. Remember, up is used when migrations are run, and down is used when migrations are rolled back.
Inside our up method, we're defining that we should create a table, and provide the table name as the first argument. The second argument is a callback function, which provides access to the underlying table that'll be created. It's within this callback that we can actually define properties and columns of our table.
Inside our down method, we'll want to undo whatever it is we did within our up method so that we can successfully go forwards and backward through our migration timeline. So, since we're creating our roles table within up, we'll want to drop the table within down.
By default, AdonisJS has started us out with an auto-incrementing id column. Meaning, we don't need to worry about providing this column during creation because it'll automatically apply whatever the next id integer value should be. Additionally, it also provides two timestamps, created_at and updated_at.
In order to add additional columns, we can use this table property and the methods available to chain onto it to build each of our table column definitions. The first chained method will be the column type, like string, boolean, int, etc.
Defining Our Role Columns
Let's add a name column onto our roles table.
import BaseSchema from '@ioc:Adonis/Lucid/Schema' export default class extends BaseSchema { protected tableName = 'roles' public async up () { this.schema.createTable(this.tableName, (table) => { table.increments('id') table.string('name', 50).notNullable() /** * Uses timestamptz for PostgreSQL and DATETIME2 for MSSQL */ table.timestamp('created_at', { useTz: true }) table.timestamp('updated_at', { useTz: true }) }) } public async down () { this.schema.dropTable(this.tableName) } }Copied!
- database
- migrations
- 1666820991961_roles.ts
Here we're defining that our new column will be of type string. The first argument to string is the column name. The second is the column's character size. The second argument is going to be different per column type, so please refer to the documentation on expected arguments per column type.
Then, we can specify additional properties for our name string column. Here we're specifying that our name column should not be nullable, meaning a value is required.
Defining Our User Columns
Awesome, let's define the columns for our users table next.
import BaseSchema from '@ioc:Adonis/Lucid/Schema' export default class extends BaseSchema { protected tableName = 'users' public async up () { this.schema.createTable(this.tableName, (table) => { table.increments('id') table.string('email').unique().notNullable() table.string('username', 50).unique().notNullable() table.string('password', 180).notNullable() table.string('remember_me_token').nullable() /** * Uses timestamptz for PostgreSQL and DATETIME2 for MSSQL */ table.timestamp('created_at', { useTz: true }) table.timestamp('updated_at', { useTz: true }) }) } public async down () { this.schema.dropTable(this.tableName) } }Copied!
- database
- migrations
- 1666820991962_users.ts
Unlike our roles migration, our users are going to need several columns added. Here we're:
string('email')- Defining an email column of type stringunique()- The email value should be unique, so no emails can be entered twicenotNullable()- The email requires a value
string('username', 50)- Defining a username column of type string. The max length of any one value is 50 charactersunique()- The username value should be unique, so no username can be used twicenotNullable()- The username requires a value
string('password', 180)- Defining a password column of type string. The max length of any one value is 180 characters. This stored value will be the user's password after it's hashed and salted.notNullable()- The password requires a value
string('remember_me_token')- Defining a remember me token column of type string. We'll use this in later lessons for authentication to persist a user's auth session. Note that the column name here is snake cased. This is inline with the default AdonisJS naming strategy. Following this strategy will keep things consistent and easygoing in our codebase.nullable()- The remember me token does not require a value.
Now, I'm explicitly defining whether columns are nullable or not nullable for clarity's sake. However, if you don't provide this, like our timestamps do, the column will default to being nullable.
Connecting Our User To A Role
Currently, we have our users table defined and our roles table defined, but we haven't connected the two together. We'll want our user to belong to a single specific role, so we'll want to define this as a role_id column on our users table. Using migrations, we can easily do this while also creating a foreign key.
The foreign key will prevent us from giving our user a role that doesn't exist within our roles table.
import BaseSchema from '@ioc:Adonis/Lucid/Schema' export default class extends BaseSchema { protected tableName = 'users' public async up () { this.schema.createTable(this.tableName, (table) => { table.increments('id') table.integer('role_id').unsigned().references('id').inTable('roles') table.string('email').unique().notNullable() table.string('username', 50).unique().notNullable() table.string('password', 180).notNullable() table.string('remember_me_token').nullable() /** * Uses timestamptz for PostgreSQL and DATETIME2 for MSSQL */ table.timestamp('created_at', { useTz: true }) table.timestamp('updated_at', { useTz: true }) }) } public async down () { this.schema.dropTable(this.tableName) } }Copied!
- database
- migrations
- 1666820991962_users.ts
Here we're
integer('role_id')- Defining a column of type integer, namedrole_id. This name does have purpose, and matches the default naming convention of AdonisJS, snake cased model name to the primary key column.unsigned()- Specify that the value cannot contain negatives,increments('id')will create an unsigned column, so this is needed to match that definition.references('id')- Specify that our foreign key should reference theidcolumn for...inTable('roles')- Specify that the referenceidis to therolestable.
Instead of .references('id').inTable('roles'), you could alternatively do .references('roles.id'). But, I prefer the former and find it more readable. You pick whichever fits your fancy though.
Migration Execution Order Does Matter
Now it's also important to note that when you're working with relationships the order of our migrations matters. In order for our users table to successfully create a foreign key to our roles table id, our roles table will need to already exist within our database. So, in other words, we'll need our roles migration to run before our users migration. This order can be easily controlled by the timestamp prefix on the migration's filenames.
Using Migrations To Do One-Time Data Seeding
So far, we've only used migrations to create tables, but they can be used for so much more. They can alter existing tables, create views, stored procedures, and we can even use them as a one-time seeder.
Seeders allow you to create initial, test, or stub data within your database. Now, AdonisJS comes with actual seeders, which we'll cover in a later lesson, but we have a specific use case here where we can use a migration instead. It's pretty typical for an application to have a pre-defined list of roles, which rarely ever changes. We also don't want our roles table to exist without having our roles within it. So, although seeders would be the official way to seed this data into our roles table, let's see what this looks like via a migration.
First, let's create an enum for what will be our role ids. We can use this enum to explicitly set our role id values. Note, you typically wouldn't want to do in a normal table since it's self-incrementing, but here we'll want these ids to match our enum.
I'll be placing mine at app/Enums/Roles.ts, others prefer to put their enums within contracts, again... you do you!
enum Roles { MEMBER = 1, ADMIN = 2 } export default RolesCopied!
- app
- Enums
- Roles.ts
Then, all we'll need to do is jump back into our roles migration file and define our role records within the up method using defer.
import BaseSchema from '@ioc:Adonis/Lucid/Schema' import Roles from 'App/Enums/Roles' export default class extends BaseSchema { protected tableName = 'roles' public async up () { this.schema.createTable(this.tableName, (table) => { table.increments('id') table.string('name', 50).notNullable() /** * Uses timestamptz for PostgreSQL and DATETIME2 for MSSQL */ table.timestamp('created_at', { useTz: true }) table.timestamp('updated_at', { useTz: true }) }) this.defer(async (db) => { await db.table(this.tableName).insert([ { id: Roles.MEMBER, name: 'Member' }, { id: Roles.ADMIN, name: 'Admin' } ]) }) } public async down () { this.schema.dropTable(this.tableName) } }Copied!
- database
- migrations
- 1666820991961_roles.ts
Now, the database insert query here may look foreign to you since we haven't covered queries in any way yet but stick with me.
First, we're importing our Roles enum
Then, within our
upmethod, we're callingthis.defer. By using defer we'll defer the callback's execution until after the migration is run. Thedefermethod also provides the Database module.Inside the
defermethod, we're using the Database module's insert query method to create the two roles we'll need for our application.
One Last Migration Run
Let's verify that everything we've done up to this point is working by giving our migrations one last run!
node ace migration:runCopied!

Awesome, all three of our migrations, including our roles_seed, completed successfully! Let's verify everything is correct within our database.
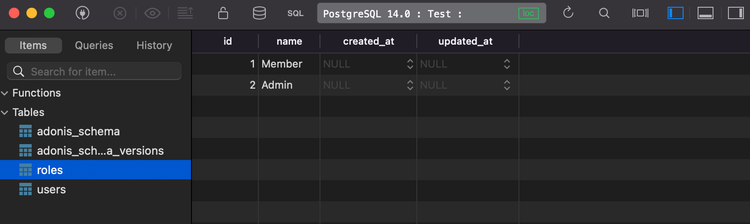
Perfect! As you can see, we have our roles table back and it has the Member and Admin roles we defined created within it. Then, our users table is back as well, this will be empty for now.
Next, We'll Focus On Alter Migrations
So, in this lesson, we've learned what migrations are, the flow of migrations, the Ace CLI commands applicable to them, and a lot more. In the next lesson, we'll work to fill in the gaps by talking specifically about altering tables with migrations and what that flow looks like after your application hits a production environment.
