Trying to generate a styled PDF in NodeJS differs greatly from trying to do so on the client side since we can't make direct use of canvases or browser APIs to simplify the task. In NodeJS we could generate the HTML for the PDF, but we'd still run into issues when it comes to styling. Thankfully, as you'll learn in this lesson, headless browsers like Puppeteer come to the rescue to solve this issue by allowing us to fully render our styled page and generate a PDF, all programmatically.
In this written lesson we'll just be focusing on the task at hand. For a complete start-to-finish walkthrough, please watch this lesson's video. You can also find timestamps throughout the lesson pointing to the topic within the video.
The complete code for this lesson is on GitHub as well.
The Approach
For this lesson, we'll be dynamically generating an invoice that'll look like the screenshot below.
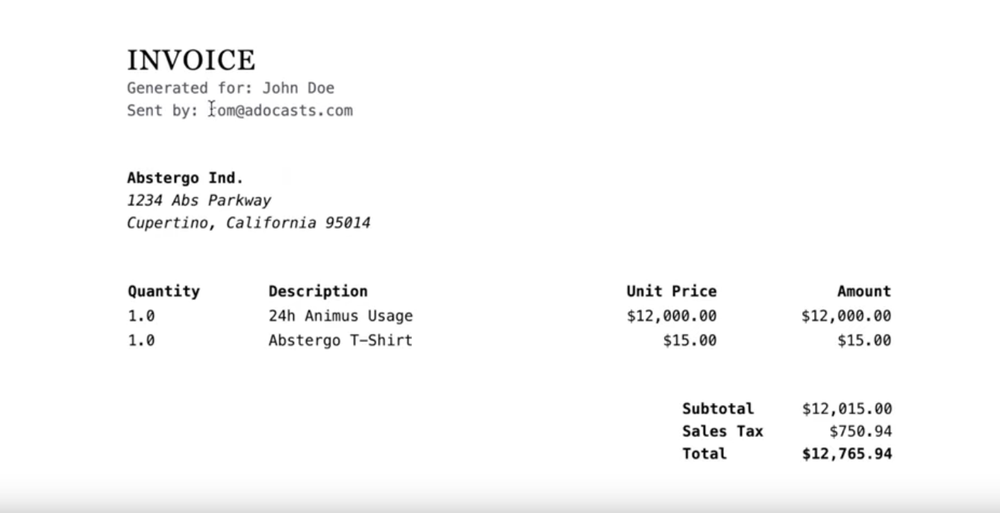
It will:
Have a file name containing the recipient's name
Contain the recipient's name within the PDF itself
Contain the invoice sender's email (our authenticated user)
We'll then send this invoice as an attachment in an email, which will:
Go to our recipient's email
Be from the sender's email (our authenticated user)
Contain the recipient's name within the subject
The only manual process here will be providing the recipient's name and email and submitting a form to kick off the process. Everything else will be completely done programmatically. Alternative approaches could include creating a scheduled job or an Ace CLI command to kick off this process as well.
Installing Dependencies
We'll really only need to add two dependencies in order to create the PDF and send it via email, puppeteer and AdonisJS Mail, so let's go ahead and get those installed.
npm i @adonisjs/mail puppeteerCopied!
Then, we'll want to configure @adonisjs/mail within our application
node ace configure @adonisjs/mail › Select the mail drivers you are planning to use ● SMTP ○ Amazon SES ○ Mailgun ○ SparkPostCopied!
It'll ask which mail drivers you plan on using. I'll be using SMTP, since I'm going to just send the emails off to MailTrap. Once you make your selection(s), it'll install the needed dependencies.
Creating An Invoice Page
First, we're going to need a page to render and use for our PDF content, so let's go ahead and create that, using the Ace CLI command make:view.
node ace make:view invoice # CREATE: resources/views/invoice.edgeCopied!
This will create a view called invoice within our resources/views directories.
Invoice Markup
Next, let's add some generic HTML markup for our PDF invoice. I'll drop the full page's HTML markup below.
{{-- resources/views/invoice.edge --}} <!DOCTYPE html> <html lang="en"> <head> <meta charset="UTF-8"> <meta name="viewport" content="width=device-width, initial-scale=1.0"> <title>Invoice for {{ recipient.name }}</title> <script src="https://cdn.tailwindcss.com"></script> </head> <body class="bg-gray-100 m-6"> <main class="bg-white w-[11in] h-[8.5in] mx-auto p-[1.25in]"> <div class="mb-12"> <h1 class="text-3xl font-serif tracking-wider"> INVOICE </h1> @if (recipient) <h5 class="font-mono text-gray-600"> Generated for: {{ recipient.name }} </h5> @endif <h5 class="font-mono text-gray-600"> Sent by: {{ user.email }} </h5> </div> <div class="mb-12 font-mono"> <h3 class="font-bold">Abstergo Ind.</h3> <address> 1234 Abs Parkway<br/> Cupertino, California 95014 </address> </div> <table class="w-full mb-12 font-mono"> <tr> <td class="font-bold">Quantity</td> <td class="font-bold">Description</td> <td class="font-bold text-right">Unit Price</td> <td class="font-bold text-right">Amount</td> </tr> <tr> <td>1.0</td> <td>24h Animus Usage</td> <td class="text-right">$12,000.00</td> <td class="text-right">$12,000.00</td> </tr> <tr> <td>1.0</td> <td>Abstergo T-Shirt</td> <td class="text-right">$15.00</td> <td class="text-right">$15.00</td> </tr> </table> <dl class="flex flex-col items-end font-mono"> <div class="inline-grid grid-cols-2 justify-end"> <dt class="font-bold">Subtotal</dt> <dd class="w-28 text-right">$12,015.00</dd> </div> <div class="inline-grid grid-cols-2 justify-end"> <dt class="font-bold">Sales Tax</dt> <dd class="w-28 text-right">$750.94</dd> </div> <div class="inline-grid grid-cols-2 justify-end"> <dt class="font-bold">Total</dt> <dd class="w-28 text-right font-bold">$12,765.94</dd> </div> </dl> </main> </body> </html>Copied!
The main thing to note here is that we'll need to provide a recipient and user into the view's data. The recipient will be the person the invoice will be sent to and the user will be the authenticated user that generated and sent the invoice.
Creating Our Invoice Form
Next, we'll need a form that'll be in charge of collecting our recipient's name and email. I'll be placing this on the app's default welcome.edge page, replacing the contents of <main> with the below. We'll have this form kick-off to a route called invoice.send, we'll be creating this route next.
{{-- resources/views/welcome.edge --}} <main class="w-full md:w-3/4 bg-white rounded-xl p-6"> @if (auth.user) <form method="POST" action="{{ route('invoice.send') }}" class="max-w-sm"> <input type="text" name="recipient[name]" /> <input type="email" name="recipient[email]" /> <button type="submit"> Send Invoice </button> </form> @else <p> Please login or register to generate an invoice </p> @endif </main>Copied!
Handling Our Invoice Form Submission
Now that we have our invoice form created, let's create the route to handle its submission. First, let's create a controller for this called InvoicesController.
node ace make:controller Invoice # CREATE: app/Controllers/Http/InvoicesController.tsCopied!
Within this controller, let's create a method called send.
import type { HttpContextContract } from '@ioc:Adonis/Core/HttpContext' import { schema, rules } from '@ioc:Adonis/Core/Validator' import InvoiceValidator from 'App/Validators/InvoiceValidator' import Route from '@ioc:Adonis/Core/Route' import Event from '@ioc:Adonis/Core/Event' import User from 'App/Models/User' export default class InvoicesController { public async send({ request, response, auth }: HttpContextContract) { // create validation schema. recipient[name] will result in an object being posted const _schema = schema.create({ recipient: schema.object().members({ name: schema.string({ trim: true }), email: schema.string({ trim: true }, [rules.email()]) }) }) // get the validated data const data = await request.validate({ schema: _schema }) // for now, let's just redirect back to the welcome page return response.redirect().toPath('/') } }Copied!
Okay, so for now, let's just validate that the form is including the data schema we expect using the AdonisJS Validator. Our field names of recipient[name] and recipient[email] will be posted as an object, structured like the one below. So, we'll want our validation schema to reflect that.
{ "recipient": { "name": "John Doe", "email": "test@test.com" } }Copied!
Lastly, let's rig our InvoicesController.send method up to a route. We'll name it invoice.send and add the auth middleware to it so that a user has to be authenticated to POST to it.
Route .post('/invoice/send', 'InvoicesController.send') .as('invoice.send') .middleware(['auth'])Copied!
- start
- routes.ts
If you haven't you can register the named auth middleware within your start/kernel.ts file.
Server.middleware.registerNamed({ auth: () => import('App/Middleware/Auth') })Copied!
- start
- kernel.ts
Adding Our PDF Generator
Next, let's actually get our invoice page generated as a PDF. For this, we'll use Puppeteer, which is a headless browser. Meaning, we can programmatically render and manipulate our page in a browser instance without actually needing to open it within the user's browser. To make this more dynamic, let's put it inside an AdonisJS Event. This will allow you to expand upon this lesson and kick off the PDF generation and sending via a scheduled job or Ace CLI command if you wish.
So, let's create a new preload file called events.
node ace make:prldfile events › Select the environment(s) in which you want to load this file. ○ Load file in all environments ○ Environment for ace commands ○ Environment for REPL sessions ● Environment for HTTP requests ○ Environment for the test processCopied!
It'll ask, which environments to load this file in. Feel free to select whichever is applicable to your use case. I'll be limiting it to HTTP requests.
Creating Our Event Listener
Now let's jump into our new file at start/events.ts and register our event listener!
import Event from '@ioc:Adonis/Core/Event' import User from 'App/Models/User' interface SendInvoice { user: User recipient: { name: string, email: string } signedInvoicePath: string } Event.on('send:invoice', async ({ user, recipient, signedInvoicePath }: SendInvoice) => { // TODO })Copied!
- start
- events.ts
Let's create an event called send:invoice that'll accept an object containing our auth user, our recipient form data, and a signed invoice URL path.
Adding Puppeteer
Next, let's import Puppeteer and create our browser instance and add a new page tab to it.
import Event from '@ioc:Adonis/Core/Event' import User from 'App/Models/User' import puppeteer from 'puppeteer' interface SendInvoice { user: User recipient: { name: string, email: string } signedInvoicePath: string } Event.on('send:invoice', async ({ user, recipient, signedInvoicePath }: SendInvoice) => { // TODO const browser = await puppeteer.launch() const page = await browser.newPage() await page.emulateMediaType('screen') })Copied!
- start
- events.ts
Here we're importing Puppeteer and creating a browser by calling puppeteer.launch(), creating a browser page by calling browser.newPage(), and lastly, emulate the screen media type.
Adding Route for PDF Contents
Now we need a page for Puppeteer to actually visit, this page will render out the contents of our generated PDF. So, this should be our invoice.edge page. Let's add a method for it within our InvoicesController.ts called generate.
NOTE: Our Puppeteer browser has a different session, cookies, etc than our actual user's browser. Meaning, if a user is logged into our application, they won't be within our Puppeteer browser. So, we can't use an auth guard here, but we also won't want our invoice.edge page to be publically visible. To solve this, let's require it to have a valid Signed URL signature.
import type { HttpContextContract } from '@ioc:Adonis/Core/HttpContext' import InvoiceValidator from 'App/Validators/InvoiceValidator' import Route from '@ioc:Adonis/Core/Route' import Event from '@ioc:Adonis/Core/Event' import User from 'App/Models/User' export default class InvoicesController { public async send({ request, response, auth }: HttpContextContract) {/* ... */} public async generate({ request, response, view, params }: HttpContextContract) { if (!request.hasValidSignature()) { return response.badRequest('The route signature is invalid') } const recipient = request.qs().recipient const user = await User.findOrFail(params.uid) return view.render('invoice', { user, recipient }) } }Copied!
- app
- Controllers
- Http
- InvoicesController.ts
First, we're verifying that the route contains a valid Signed URL signature. If it doesn't we stop our user right there and return a bad request. We'll grab our recipient data on the URL's query string if the signature is valid.
Remember, this route will be visited inside our Puppeteer headless browser, so there won't be an authenticated user. But, we can provide the authenticated user via a route parameter, which is what we're doing here. That'll allow us to grab the user's data and provide it to our invoice page data.
Let's rig our InvoicesController.generate method up to a route.
Route.get('/pdf/invoice/:uid', 'InvoicesController.generate').as('pdf.invoice') Route.post('/invoice/send', 'InvoicesController.send').as('invoice.send').middleware(['auth'])Copied!
- start
- routes.ts
Opening Our PDF Contents Inside Puppeteer
We're now ready to visit our pdf.invoice page within our Puppeteer page in our send:invoice event. So, let's jump back into our start/events.ts file and add that in! Do note, we'll need to provide the protocol and domain to the page.goto() method to visit our page. I'd recommend using an Environment Variable for this in production.
import Event from '@ioc:Adonis/Core/Event' import User from 'App/Models/User' import puppeteer from 'puppeteer' interface SendInvoice { user: User recipient: { name: string, email: string } signedInvoicePath: string } Event.on('send:invoice', async ({ user, recipient, signedInvoicePath }: SendInvoice) => { const browser = await puppeteer.launch() const page = await browser.newPage() await page.emulateMediaType('screen') await page.goto(`http://localhost:3333${signedInvoicePath}`, { waitUntil: 'networkidle0' }) const pdf = await page.pdf({ format: 'a4' }) })Copied!
- start
- events.ts
Once we visit the page and wait for the appropriate event signal (here we're waiting for the network events to idle), we can go ahead and generate our PDF using page.pdf(). This will return the PDF as a Buffer. You could alternatively use page.createPDFStream() if you need the PDF data as a stream.
Calling Our Event
At the moment nothing will happen, because, within our InvoicesController.send method, all we're doing is validating the form data and returning. So, let's next add a call to our send:invoice method. We'll additionally need to generate our Signed URL to our pdf.invoice route.
import type { HttpContextContract } from '@ioc:Adonis/Core/HttpContext' import InvoiceValidator from 'App/Validators/InvoiceValidator' import Route from '@ioc:Adonis/Core/Route' import User from 'App/Models/User' import Event from '@ioc:Adonis/Core/Event' export default class InvoicesController { public async send({ request, response, auth }: HttpContextContract) { const _schema = schema.create({ recipient: schema.object().members({ name: schema.string({ trim: true }), email: schema.string({ trim: true }, [rules.email()]) }) }) const data = await request.validate({ schema: _schema }) const params = { uid: auth.user!.id } const options = { expiresIn: '3m', qs: data } const path = Route.makeSignedUrl('pdf.invoice', params, options) Event.emit('send:invoice', { user: auth.user, recipient: data.recipient, signedInvoicePath: path }) return response.redirect().toRoute('home') } public async generate({ request, response, view, params }: HttpContextContract) {/* ... */} }Copied!
- app
- Controllers
- Http
- InvoicesController.ts
First, we're getting our Signed URL path, providing it our authenticated user's id as the route's UID param and our recipient data as the query string contents. Then, we're specifying that the signature should only remain valid for three minutes, so very short life. If you end up using this in a queue system be sure to adjust for the expected duration of your queue.
Sending Our PDF As An Email Attachment
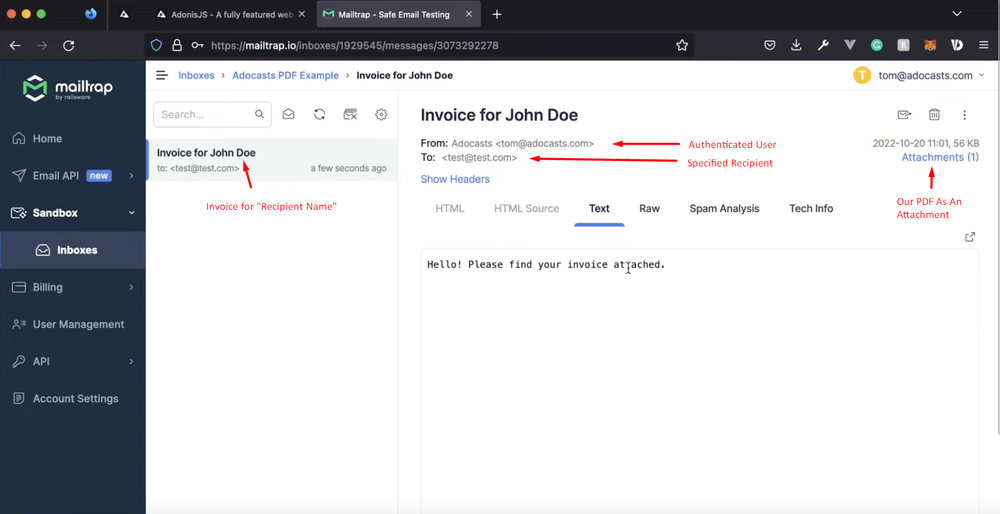
Lastly, we need to send our PDF Buffer as an email attachment, using our recipient and authenticated user's data for the from and to email addresses. The AdonisJS Mailer makes this super simple, as you'll see below.
import Event from '@ioc:Adonis/Core/Event' import User from 'App/Models/User' import puppeteer from 'puppeteer' import Mail from '@ioc:Adonis/Addons/Mail' import { string } from '@ioc:Adonis/Core/Helpers' interface SendInvoice { user: User recipient: { name: string, email: string } signedInvoicePath: string } Event.on('send:invoice', async ({ user, recipient, signedInvoicePath }: SendInvoice) => { const browser = await puppeteer.launch() const page = await browser.newPage() await page.emulateMediaType('screen') await page.goto(`http://localhost:3333${signedInvoicePath}`, { waitUntil: 'networkidle0' }) const pdf = await page.pdf({ format: 'a4' }) await Mail.send(message => { message .from(user.email, 'Adocasts') .to(recipient.email) .attachData(pdf, { filename: `${string.snakeCase(recipient.name)}_invoice.pdf` }) .subject(`Invoice for ${recipient.name}`) .text('Hello! Please find your invoice attached.') }) })Copied!
- start
- events.ts
First, we're importing AdonisJS Mail and the string helper module. Then, we're creating an email instance by calling Mail.send(). The email instance is provided as our callback argument, ie: message.
With this message, we're specifying:
The email should be from our authenticated user's email, with the name "Adocasts"
The email should go to our specified recipient's email
Then, we're attaching our PDF Buffer using
attachDataand send it with the recipient's name in the file nameNext, we're setting the subject to include the recipient's name
Lastly, we have a boilerplate message noting the invoice is attached
Congratulations!
Once you've done all of the above, congratulations! You've successfully generated a dynamic PDF and sent it as an email attachment. Below is an example of what this looks like within MailTrap.