In prior lessons, we created a Register and Login page. Both of these pages contain a form that, when submitted, sends a POST request off to a route. We aren't currently doing anything with these routes, beyond console logging the body to confirm it's received.
Creating & Applying Validation
In order to learn about InertiaJS' form validation error handling, we'll need to first add validation to both of these routes in our AdonisJS application. Since both register and login will use the same fields we can make a generic validator called AuthValidator.
node ace make:validator AuthWithin our AuthValidator, we'll define rules for both our email and password fields. I'll omit the comment blocks for brevity's sake.
import { schema, CustomMessages } from '@ioc:Adonis/Core/Validator' import { schema, rules, CustomMessages } from '@ioc:Adonis/Core/Validator' import type { HttpContextContract } from '@ioc:Adonis/Core/HttpContext' export default class AuthValidator { constructor(protected ctx: HttpContextContract) {} public schema = schema.create({ email: schema.string({ trim: true }, [rules.email()]), password: schema.string({}, [rules.minLength(8)]) }) public messages: CustomMessages = {} }Copied!
- app
- Validators
- AuthValidator.ts
First, we'll want to include rules within our import from @ioc:Adonis/Core/Validator. Then, we'll define our email and password schema properties, setting them both to strings. Our email will be trimmed and verified it's an email value. Our password will require a minimum length of eight characters.
Applying Our Validator
Now that we have a validator created, let's go ahead and apply it to our login and register POST route handlers.
Route.post('/login', async ({ request, response }) => { console.log({ loginBody: request.body() }) const data = await request.validate(AuthValidator) console.log({ data }) return response.redirect().toRoute('app.index') }).as('login.store') Route.post('/register', async ({ request, response }) => { console.log({ registerBody: request.body() }) const data = await request.validate(AuthValidator) console.log({ data }) return response.redirect().toRoute('app.index') }).as('register.store')Copied!
- start
- routes.ts
How InertiaJS Handles Validation
Okay, now we have validation on our login and register forms. Let's next take a look, using the VueJS Devtools, at what happens with InertiaJS when we submit our form with invalid data.
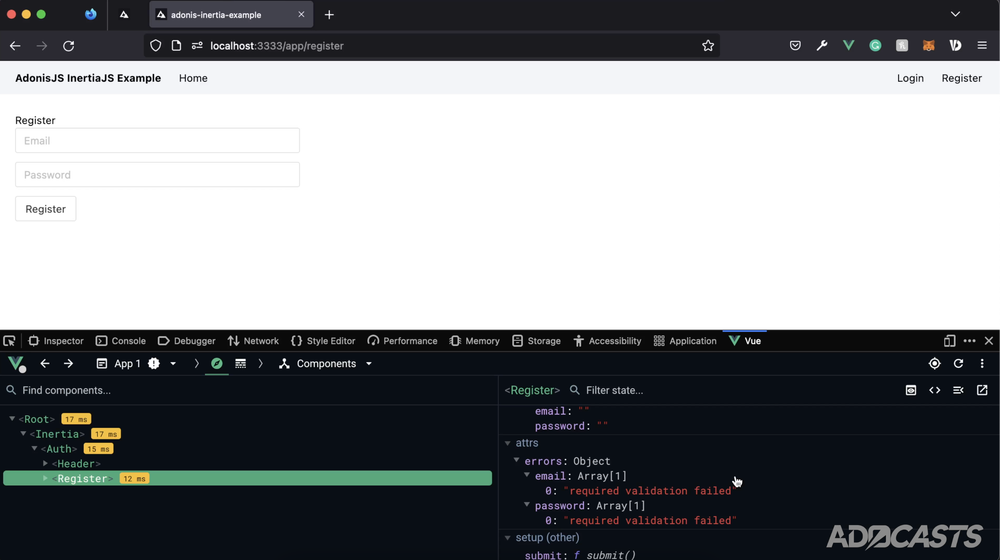
As you can see, InertiaJS automatically plops our validation errors onto our VueJS component. Now, it's listed within the attributes (attrs) at the moment, but that's only because we haven't registered it as a prop. So, let's go ahead and do that next.
// resources/js/Pages/Register.vue
// resources/js/Pages/Login.vue
export default {
layout: AuthLayout,
props: {
errors: {
type: Object,
default: () => ({})
}
},
// ...
}Note, you'll want to do this for both your register and login pages. All we're doing here is registering the prop errors as an object and defining its default value as an empty object. Setting the default here simply saves us from having to check for its existence, so that we only need to worry about individual properties on the object.
How Are Errors Made Available?
At this point, you may be wondering exactly how errors is made available as a prop on both of these pages. This is actually something set up by the eidellev/inertiajs-adonisjs adapter package. If you look within your start/inertia.ts file, you'll see the below.
import Inertia from '@ioc:EidelLev/Inertia'; Inertia.share({ errors: (ctx) => { return ctx.session.flashMessages.get('errors'); }, }).version(() => Inertia.manifestFile('public/assets/manifest.json'));Copied!
This file allows us to share values form our AdonisJS server to our Vue 3 client application. As you can see this is pre-populated with errors, whose value is the value of our errors flash messaging, aka our validation messages. It's worth noting you can add other properties you need to share with your Vue application here as well. Okay, back to our validation!
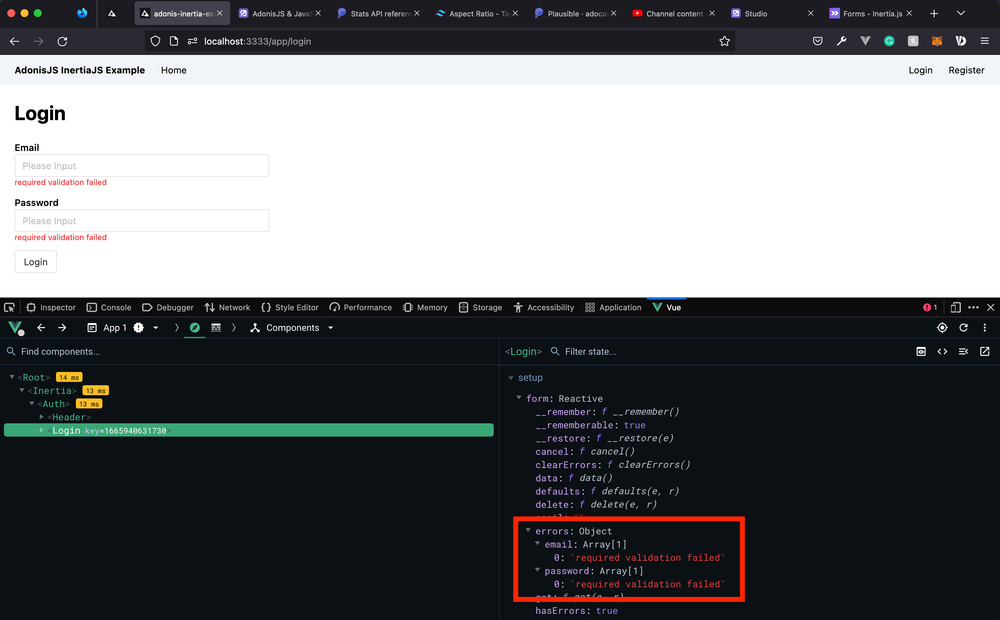
Errors Are Also On the Form Helper
Additionally, if you make use of the useForm hook like we are on our Login page you can grab the errors object directly off the form within your data as well, as you can see below.
Special thanks to Pierre-Marc Marin for reminding me about the errors existing on the useForm data object!
Displaying Validation Error Messages
Now that we have our errors defined on our pages, we're good to go ahead and apply them within our templates. I'm also going to wrap each input in a div with a margin to appear more like a form group.
<template> <! resources/js/Pages/Register.vue > <div> <h1>Register</h1> <form @submit.prevent="submit" class="max-w-sm"> <n-input type="email" v-model:value="form.email" placeholder="Email" class="mb-3" /> <div class="mb-3"> <n-input type="email" v-model:value="form.email" placeholder="Email" /> <div v-if="errors.email" class="text-xs text-red-500 mt-1"> {{ errors.email.join(', ') }} </div> </div> <n-input type="password" v-model:value="form.password" placeholder="Password" class="mb-3" /> <div class="mb-3"> <n-input type="password" v-model:value="form.password" placeholder="Password" /> <div v-if="errors.password" class="text-xs text-red-500 mt-1"> {{ errors.password.join(', ') }} </div> </div> <n-button attr-type="submit"> Register </n-button> </form> </div> </template>Copied!
For our actual error display, since we're defaulting errors to an empty object, all we need to do is check to see whether the email and password properties exist on the object (ie: an error occurred). If an error did occur, as we saw in the earlier screenshot, the properties contain an array of error messages, structured like the one below.
const errors = {
  email: ['required validation failed'],
  password: ['required validation failed']
}
Hence, when it comes to displaying the actual error within our template, we can join whatever errors are on the properties as a comma-delimited list by joining the array, like the below.
{{ errors.email.join(', ') }}Creating A Form Input Component
Now, it's likely that we'll want to re-use the form group block of code we just created above all over our application, so let's move it off into a component.
<template> <! resources/js/components/FormInput.vue > <div class="mb-3"> <label> <span v-if="label" class="block font-semibold">{{ label }}</span> <n-input :type="type" v-model:value="internalValue" :placeholder="placeholder" /> </label> <div v-if="Array.isArray(errors)" class="text-xs text-red-500"> {{ errors.join(', ') }} </div> </div> </template> <script setup> import { computed } from 'vue' const props = defineProps({ type: { type: String, default: 'text' }, label: String, placeholder: String, modelValue: String, errors: Array }) const emit = defineEmits(['update:modelValue']) const internalValue = computed({ get() { return props.modelValue }, set(value) { emit('update:modelValue', value) } }) </script>Copied!
Our input will accept a type (defaulting to text), label, placeholder, modelValue, and the field's errors as its props. Then, we'll use a computed field to get and set an internalValue. Additionally, note that our errors here will be an array since they'll be specific to the individual field. So, we'll want to use Array.isArray(errors) to check and see if the field has any errors.
Applying Our Form Input Component
Lastly, let's go ahead and apply our new component on both our register and login forms.
<template> <! resources/js/Pages/Register.vue > <div> <h1 class="text-3xl font-bold mb-6">Register</h1> <form @submit.prevent="submit" class="max-w-sm"> <div class="mb-3"> <n-input type="email" v-model:value="form.email" placeholder="Email" /> <div v-if="errors.email" class="text-xs text-red-500 mt-1"> {{ errors.email.join(', ') }} </div> </div> <div class="mb-3"> <n-input type="password" v-model:value="form.password" placeholder="Password" /> <div v-if="errors.password" class="text-xs text-red-500 mt-1"> {{ errors.password.join(', ') }} </div> </div> <form-input label="Email" type="email" v-model="form.email" :errors="errors.email" /> <form-input label="Password" type="password" v-model="form.password" :errors="errors.password" /> <n-button attr-type="submit"> Register </n-button> </form> </div> </template> <script> import AuthLayout from '@/Layouts/Auth.vue' import FormInput from '@/components/FormInput.vue' import { reactive } from 'vue' import { Inertia } from '@inertiajs/inertia' export default { layout: AuthLayout, props: { errors: { type: Object, default: () => ({}) } }, components: { FormInput }, // ... } </script>Copied!
And, the same for our login page.
<template> <! resources/js/Pages/Login.vue > <div> <h1 class="text-3xl font-bold mb-6">Login</h1> <form @submit.prevent="form.post('/app/login')" class="max-w-sm"> <n-input type="email" v-model:value="form.email" placeholder="Email" class="mb-3" /> <n-input type="password" v-model:value="form.password" placeholder="Password" class="mb-3" /> <form-input label="Email" type="email" v-model="form.email" :errors="errors.email" /> <form-input label="Password" type="password" v-model="form.password" :errors="errors.password" /> <n-button attr-type="submit"> Login </n-button> </form> </div> </template> <script> import AuthLayout from '@/Layouts/Auth.vue' import FormInput from '@/components/FormInput.vue' import { useForm } from '@inertiajs/inertia-vue3' export default { layout: AuthLayout, props: { errors: { type: Object, default: () => ({}) } }, components: { FormInput }, // ... } </script>Copied!
Next Up
Now that we have a decent understanding of how to approach form validation error handling within InertiaJS, we can take a slight pivot. In the next lesson, we'll learn how to handle flash messaging within our Adonis Inertia application.
Join The Discussion! (6 Comments)
Please sign in or sign up for free to join in on the dicussion.
Anonymous (GeckoArdys487)
Great job as always! I hope in the future you will show us how to implement wysiwyg editor with code highlighting! <3
Please sign in or sign up for free to reply
tomgobich
Thank you! Yes, planning a whole series specifically on the topic. You can expect it in the coming month or two. :)
Please sign in or sign up for free to reply
vexapi
Any chance of making a SSR tutorial with Adonis and Inertia? I have tried to implement SSR but failed. I have followed your article on SSR but there were nothign about running SSR Inertia in production environment. In production mode,
node build/server.jswell only when I add the env pathENV_PATH=~/adonis-inertia-example/.env node build/server.js(some security issue?) works but the inertia pages are still not generating the html tags when you show them in page source or when you disable javascript. Only with JavaScript the page is rendered. But curl doesn't show anything expect the div app.Also, in tandem with
node build/server.jsI have tried to runnode inertia/srr/srr.jsfor the production mode in a separate iterm2 tab as an alternative tonode ace ssr:watchI use for Inertia when in development mode. But I was just returned back to the terminal - not sure what am I doing wrong at all. And the page via curl or page source in browser still lacked html tags.Perhaps you could create some specific video to tackle setting up a simple hello-world Adonis app using Inertia with SSR from scratch? Perhaps including the
ENV_PATH=~/adonis-inertia-example/.env node build/server.jsor something better when in production? Especially the SSR part is completelyPlease sign in or sign up for free to reply
tomgobich
Hi vexapi! Yes, I am planning on covering SSR at the end of this Adonis + Inertia series with a new project setup. I personally haven't worked with Inertia SSR yet beyond what I discussed in the news post I put out, but I'll be sure to check the production build when I get to this to ensure that'll work properly!
Please sign in or sign up for free to reply
Anonymous (TurkeyCrista744)
Great course, looking for more!
Please sign in or sign up for free to reply
tomgobich
Thank you!! Currently, this series is on hiatus as InertiaJS just released version 1. So, I didn't want to continue releasing lessons for what will soon be an outdated codebase.
Please sign in or sign up for free to reply